Monday 13 February 2017

AWS Exams - Things to Remember

The primary audience for this post is myself.

I'm taking a number of AWS Certification exams and there are particular areas that I struggle to recall. Here is a list of them SO FAR. This should in no means be considered a complete list.

  • Know which services have native encryption at rest within the region, and which do not. For example, Storage Gateway and Glacier do, but DynamoDB, CF, and SQS do not. 
  • Have a good understanding of how Route53 supports all of the different DNS record types, and when you would use certain ones over others.
  • Know the difference between Directory Service's AD Connector and Simple AD. "Use Simple AD if you need an inexpensive Active Directory–compatible service with the common directory features. AD Connector lets you simply connect your existing on-premises Active Directory to AWS."
  • Elastic IPs are free if you have only one EIP per instance and the associated instance is running.
  • Know what four high level categories of information Trusted Advisor supplies: Cost Optimization, Performance, Security, and Fault Tolerance
    •  https://aws.amazon.com/premiumsupport/trustedadvisor/
  • Know about disaster recovery and the difference between RTO and RPO. 
    • https://d0.awsstatic.com/whitepapers/aws-disaster-recovery.pdf
  • Any CIDR block has 5 reserved IP addresses for AWS. (The first 4 and the last 1)
  • Don’t touch Main route table Create another routetable for route out to internet (0.0.0.0/0 IGW). Last thing you associate this new route table to one of the subnet which will make it public. 
  • Read data storage whitepaper
    •  https://d0.awsstatic.com/whitepapers/AWS%20Storage%20Services%20Whitepaper-v9.pdf
  • Raid 0(no redundancy / fault tolerance, high speed - low cost) - high I/O performance, Raid 1 - mirror two volumes together (disaster recovery, redundant , no performance improvement, writes latency increase) , Raid 5(R/W operation will continue, more popular, combination of performance, fault tolerance)

Tuesday 7 June 2016

Creating a Web Drive on AWS

I don't trust cloud storage services, and you should either. So here is a guide to create your own online drive.

I should note, there are a couple services out there like ownCloud and soon to be NextCloud which will likely fulfill your cloud storage needs, but I found them to be cumbersome for my small use case. Plus doing it myself was a great way to learn some new things.

I choose AWS as a hosting solution because I already use them for my website and other random projects.

1. Create an EC2 Instance

In the AWS console, navigate to EC2 then click Launch Instance.

Note: Make sure you have selected the region you want the instance to be created in.

Select an Ubuntu Server AMI instance.
Select an Instance Type. I'm choosing t2.micro because it should fit my needs. This size is also in the free tier for those that are new to AWS.
Click Next
Click Next
Add some tags to your instance for identification. e.g. Name=CloudDrive
Configure Security Group. Add HTTP to your security group.
Launch the instance and generate a new key pair. It is always good practice to generate a new keypair for each instance.
Write down the created instances public IP address for future reference.

2. (Optional) Update your DNS Records

This will allow a friendly name for your site. e.g. webdrive.standen.link

In Route 53, or your favourite domain registrar, add a CNAME with a value of the public DNS of the instance you just created.

3. Install Apache with SSL

SSH into your instance, using the public IP address obtained earlier.

3.1 SSH using PuTTY on Windows (Skip this step if you are not using PuTTY on Windows)

Access PuTTY Key Generator and load your keypair downloaded earlier. (xxx.pem)
Click Save private Key to store a xxx.pek file that is accessible for PuTTY
When accessing your instance via PuTTY you will need to add this file under Connection > SSH > Auth in the "private key file for authentication" box.

3. Cont. 

Login as user ubuntu

Obtain root permissions
sudo -s

Update apt-get cache
apt-get update

Install Apache with SSL
apt-get install apache2 libapache2-mod-auth-mysql apache2-utils

4. Get a Certificate for SSL

There are a couple options for this. Each is outlined or linked below. I recommend option 3.

4.1 Generate and Self Sign your own Certificate. 

Browsers will not trust your certificate by default.
This will still enable secure communication.

Execute the following commands and fill in information as requested.

sudo openssl genrsa -des3 -out server.key 1024
sudo openssl req -new -key server.key -out server.csr
sudo openssl x509 -req -days 365 -in server.csr -signkey server.key -out server.crt

Copy the certificate into the correct folder
cp server.crt /etc/ssl/certs
cp server.key /etc/ssl/private

4.2 Use your a Certificate provided by your Favourite Certificate Authority

Costs money. Why would you pay for something that is (and should be) free? Look below.

4.3 Use Lets Encrypt

Install git on your instance
apt-get install git

Clone the certbot repository
git clone https://github.com/certbot/certbot

Update certbot and install your certificate
cd certbot
./certbot-auto --apache

During this you will have to supply the URL you will be accessing your instance from. This will either be your instance public IP address, or the address you specified in optional step 2.

Provide a valid email address! Just in case something goes wrong.

Agree to the terms and conditions, select Secure connection only.

4. Cont. 

Confirm your SSL configuration is adequate at https://www.ssllabs.com/ssltest/analyze.html?d=<your_website_here>

5. Set up WebDav

a2enmod dav
a2enmod dav_fs

Create a directory to share, and apply the appropritate permissions
mkdir /home/ubuntu/share
chown www-data:ubuntu /home/ubuntu/share

Set up a password
a2enmod auth_digest
mkdir /etc/password

Create a password for each user
htdigest -c /etc/password/digest-password CloudShare user1

Note: Additional users do not use the -c flag, as this overwrites the file.

Apply appropriate permissions to the password file
chown www-data:ubuntu /etc/password/digest-password

Edit the default-ssl config file (your config file may be default-ssl.conf)
nano /etc/apache2/sites-enabled/000-le-default-ssl.conf


Find the line CustomLog /var/log/apache2/ssl_access.log combined and under that place the following:

Alias /share /home/ubuntu/share

<Directory /home/ubuntu/share/>
  Options Indexes MultiViews
  AllowOverride None
  Order allow,deny
  allow from all
</Directory>

<Location /share>
  DAV On
  AuthType Digest
  AuthName "CloudShare"
  AuthUserFile /etc/password/digest-password
  Require valid-user
</Location>


Now restart Apache
/etc/init.d/apache2 restart


That's it!!

Well, kind of.

For information on how to map your cloud drive to your instance, check here http://www.webdavsystem.com/server/access/

You can also remove the default apache configuration for a cleaner look. You might also want to replace the instance storage with S3 or EBS storage.
I'm investigating the latter and will hopefully provide an update here when that's done.

Let me know if you have any problems in the comments below.

Wednesday 30 March 2016

Anime Phone Wallpapers

Made a couple of these mobile wallpapers a while ago. I keep misplacing them so I'm going to post them here.

They are all 1080x1920 and the bars are consistently placed.
I recommend using a background switcher like SB Wallpaper Changer to change the backgrounds over time.


Note: Artwork is not my own. I merely added the bars on the right for icon placement on my phone.

I'll do requests if your image is 1080x1920 and I like it :3

Wednesday 11 November 2015

Monday 20 July 2015

Opening new tabs with Dojo, Ajax and Safari on iPad

Recently found out that Safari won't call window.open() in a callback when using dojo.xhrPost and dojo.xhrGet. This is a false positive with the popup blocker. The pop up blocker is usually a good thing, so we don't want to just tell the user to disable it. We need another way to get around this.

Spent a good amount of time finding the answer to this, so figured I'd re-post it in case someone else has the same troubles.

For reference, I needed to do this as the page I wanted to open wouldn't be available until after a server hit was processed. Here's what I had.

dojo.xhrGet({
    url: some/url.html,
    load: function(){
        window.open('some/other/url.html');
    }
}); 

Without boring you with the details, the solution was to move the window.open() call out of the callback and then hold the window reference in a variation so that the window location could be updated after the server hit.

var winRef = window.open(); 
dojo.xhrGet({ 
    url: some/url.html,
    load: function(){
        winRef.location = 'some/other/url.html';
    }
});

Big thanks to Jens Arps for the solution to this issue.

Monday 29 June 2015

Trouble Installing Docker Compose

Had some trouble installing Docker Compose on a fresh Fedora 22 install today.
Figured I'd write it here, as this is the kind of problem I'd hit multiple times...

Needed to run the following:

sudo dnf install python-devel
fixed the "missing Python.h" error, so that I could run:

sudo pip install -U websocket
fixed the "No module named urllib.parse" error, so that I could run:

sudo pip install -U docker-compose

And then it all worked fine :)

Wednesday 11 February 2015

AWS Learnings

This post is for me not you ☺

I've started looking at Amazon Web Services as a cheap and easy way to host my various projects. Yes valued reader, that is another reason for this blog to die!
Since my memory is horrible I'm going to make a couple posts about the "problems" I faced. And by problems I mean things that weren't immediately obvious.


Creating a server


So you want to create a server? That's pretty vague. Let's attach some context.
> PHP, Linux, potential for autoscaled instances, auto load balancing, MySQL, simple code upload process.
Great! Let's use AWS Elastic Beanstalk!


  1. Click the 'Create New Application' link in the top right.
  2. Enter all the details, paying attention to: 
  3. Click Go
  4. Wait
Things of note. 
  • You don't have to choose an auto-scaled application right off the bat. You can select a single instance and change it later. This is great for testing that things actually work. 
  • You can add multiple environments later. If you want to separate dev, test and prod, you can do that. 
  • It gives you a readable URL. That's nice. 


How do I create my Application Source


A .war file for Java or a .zip for other supported languages. Pretty simple. 


Uploading a new Version


  1. Click on the environment you want to upload the new application version to. 
  2. Click "Upload and Deploy"
  3. Upload your version and give it a name
  4. Click Deploy
  5. Wait


Connecting to your RDS through PHP in your EC2


Now that you have an RDS and your PHP in an EC2 (or a couple of them), you are going to need to find a way to connect to the RDS. 


Setting environment variables


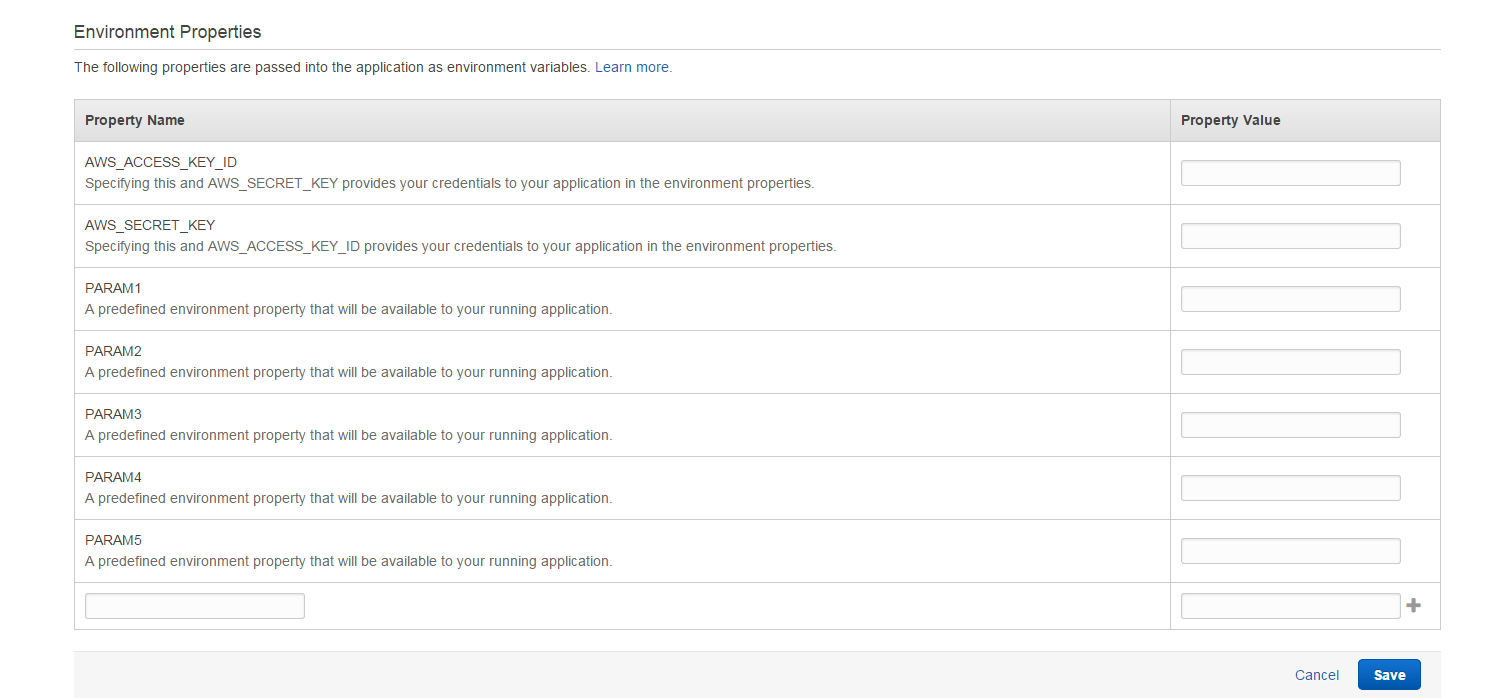
Now that you can connect to your RDS you are probably going to want to store your database access credentials as environment variables. Here's how you do that:
  1. Select the Environment for which you would like to add the variables
  2. Select Configuration from the left hand panel
  3. Click the gear icon on the Software Configuration box
  4. Scroll to the bottom of the page


I'm sure there will be more stuff but this will do as a quick post for now.